Showing posts with label Christmas Projects. Show all posts

Thursday, December 13, 2012

Wrap it Up! Christmas #3

One of the best things about being a papercrafter and owning a Cricut, is the ability to create something to go with any theme.  The theme for our holiday potluck this year is Reindeer.  I was given the task to design reindeer chinese boxes. I checked out Pinterest and Google for some inspiration and looked for images on the CTMH Art Philosophy Cricut cartridge and came up with this.....


Isn't it adorable?  But wait, they are even cuter when there is a whole herd of them hanging out together!


Art Philosophy Cartridge
Chinese Box - Pg. 24

  • Key - Shift/Drgnfly
  • Size - Fit to page 12 x 12 paper
  • Feature - Font Layer 
Art Philosophy Cartridge
Eyes/Nose - Pg 21
  • Key - Circle 1
  • Size - eyes 1/2 inch   Nose 3/4 inch
  • I added the white on the eyes with our new chalk marker which I absolutely love!!!!
Art Philosophy Cartridge
Antlers - Pg 56
  • Key - Shift/Leaf 4
  • Size - 3.5 inches (I think.  I tried several sizes between 3 inches and 4 inches)
  • Feature - Layer
Art Philosophy Cartridge
Ears - Pg 38

  • Key Shift Flower 7
  • Size - 3"
  • Feature - Layer
  • I cut the flower petals off to create 6 ears. 


Wednesday, December 12, 2012

Wrap it Up! Christmas #2

Here's another fun little gift box idea


Once again I used my Dimensional Elements In Color - Holiday to quickly decorate my  box, but you can easily adapt this to any gift giving holiday and embellish with stamps, tags, dimensional elements, ribbon and so much more.

Have you made a gable box with your Artiste Cartridge?  I'd love to see what you came up with!


Artiste Cartridge - Pg. 37

  • Key = 7
  • Feature = 3d Object
  • Size = fit to page 12 x 12 

Sizing Tip:  For some reason I've noticed that my boxes will cut bigger if I use the fit to page feature.  For instance, if the fit to page says it will cut a box 4" and I turn the feature off and then set my size to 4", the cricut will say the image won't fit.  

Monday, December 10, 2012

Wrap It Up - Christmas #1

With only two more weeks until Christmas, it's time to finish up the shopping and get those presents wrapped!  I'm going to share some fun little boxes, bags and tags that you can create to personalize and decorate gifts for co-workers, friends and all those people that provide you with great service throughout the year (hair dressers, dog groomers, water delivery, trash pick-up, apartment managers etc.....)

To make embellishing quick and easy, I used the Dimensional Elements In Color - Holiday.  

I used the Artiste Cartridge

  • Key = 1
  • Feature = 3d Object 
  • Size = fit to page on 12x12


To decorate the flap with a coordinating paper or color, attach a rectangle of the paper to the flap, flip over and trim along the edge with scissors.

Wednesday, November 07, 2012

CTMH Workshop on the Go Advent Calendar Kit

I took my Workshops on the Go Advent Calendar Kit to the Scrappin Escapes retreat last weekend and put it all together.  My picture and the picture in the catalog just don't do it justice.  It is so cute in person!  I love it. The drawers are nice and big so you can put a variety of items inside. 


Here are a few tips and suggestions to help you assemble your kit:
  • If you don't have a lot of time to sit and do it all at once, try breaking down the steps.  Cut your drawers one day.  Score/fold them all another day (if you score and pre-fold, but don't glue your drawers, it will help you identify where to stamp your images.) and then stamp and decorate at a third crafty session.
  • Stamp all of your images and then set aside to dry so you don't smudge them.
  • Assemble the boxes after you decorate them.  It's easier to work with them when they are flat.
  • Don't worry if you stamp a little crooked.  (I did!) I think it adds to the charm!
Here are some suggestions for filling up your drawers:
  • Candy (of course!)
  • A scripture a day
  • An act of service suggestion
  • A Christmas task (hang the stockings, decorate the tree etc.)
  • Or why not make each day an event, put a scripture, an act of service suggestion and a piece of candy for the blessing in each drawer so you can help your children think beyond gifts and toys!
Do you have more ideas?  Share them in the comments!

You can purchase the Workshop on the Go Kit which includes the cubby, paper, stamp pad and dimensional element decorations (I added the bitty sparkles) or you can purchase the cubby separate if you'd like to create a fun home decor item with different papers that can be used all year long.

Shopping List
G1052 Workshops on the Go Advent Calendar Kit - $44.95
Z1804 My Creations Cubby - $16.95
z1263 Bitty Sparkles - $2.95

Head on over to my website to buy your supplies!


Friday, December 16, 2011

Christmas Cards

Have you finished your cards yet?  Need a couple to add to gifts?  Well here are a couple of quick and easy ones....

Way back in August, when I was playing the the Elemental Paper, I set aside all of the Cranberry/Olive sheets so that I could use them at Christmas.  I love it when a paper pack is so versatile that you can use it for a variety of projects!

One of the things that makes these cards so quick and easy is... I cut the tree and the ornament with the Art Philosophy Cricut Cartridge!!  I put a sheet of paper in my cricut, selected the image and auto-fill and let it cut away while I cut the layers for the cards.


Tuesday, December 13, 2011

Posting Issues - Christmas Fun

Well, I planned a bunch of posts and scheduled them too...sadly something happened and they never got to you.  (haha, the holidays must be invading my brain and incorporating sad rhyming in my writing)

I figured the problem out a while ago, but for some reason I just didn't feel like fixing it.  I guess I was irritated, annoyed or just plain overwhelmed with life. Maybe I just needed a break?

Well folks, my "break" is over and it's time to get this show on the road and start posting all the cool things I have been creating.  I'm sure many of you need some last minute inspiration, right?

First up is a little box I made using the Art Philosophy Cricut Cartridge.  I used plain white cardstock and the stamp set from the Believe Workshop on the Go to add my own pattern to the box.  This is a very economical way to decorate your boxes!  And the best part?  I can switch up the colors and use the very same design for any party all year long!

I also used the B1390 Countdown for the little circle on the front.  Another fun set that can be used all year long.

Why not...

  • Create a scavenger hunt birthday and number little gifts or clues along the way.
  • Create birthday cupcake toppers with the age (1, 2, 3, 50, 60, 90!)
  • You can use the numbers on a birthday card too.


I'm always looking for fun container to "alter" and I picked this one up at Smart N Final.  The "trick" to this is, you have to create a angled pattern to wrap around the container.  Everyone who attended my Santa's workshop had the opportunity to copy my pattern so they could use this idea again.

Love the little tag on the top!  It's from...you guessed it... the Art Philosophy Cricut Cartridge.  It has a little tree cutout so I placed it on Topiary paper.  Fun and Easy!


And every other year or so I have to put a new spin on Snowman Soup.  This year I found these cool truffle boxes.  They are clear so you can see the contents inside.  My upline, Bren Yule, saw me designing my project...I had the card cut...the layers done...and I was working on the cocoa cup and she said.. "I have the perfect idea for you....Put the All Decked Out Snowman head in the cup."  It was the finishing touch I needed!!!!  Plus I was able to show my customers how to use a mask when they stamped their cup and snowman.


Well I hope you have gotten a little inspiration.  I have a few more photos to post...and a brand new camera (that was ANOTHER reason I was absent for a while...my camera bit the dust!).  Anyway...my new camera takes amazing pictures!


Monday, December 07, 2009

Day 5 - Christmas Blog Blitz - Got Candy?

This is an oldie, but goodie... wrapped candy bars. They are perfect for your Sunday School class, co-workers or anyone you want to surprise. I think this is what I'll be sending off to my hubby's dispatchers. Every year I make about 20-30 little gifties and send them off to Rick's dispatcher with instructions to share with the whole crew.... Can't leave anyone out ya know!


Thursday, December 03, 2009

Day 4 - Christmas Blog Blitz

Day 4 - My Creations 9 x 9 Memory Showcase - Share your ideas for this in the comments. I'm addicted to them now and would love to create more!


I'm almost embarassed to say how long I have had this in my stash (Item Z1198). It was so easy and so much fun to embellish that now I am hooked and I already ordered another one....

My inlaws bought us tickets to fly out during Christmas break so I thought it would be a good idea to create something to document the trip. My plan is to take some family pictures the first couple of days we are there, then get them printed and add them to this before we leave.

I precut some journaling squares and stamped images to add around the pictures so that all I have to bring with me is a paper trimmer and adhesive. I like the idea of leaving them some instant memories and now they won't have to wait for me to send them pictures later!


It's an accordian display/book - above is the first set of pages and below is the second set.
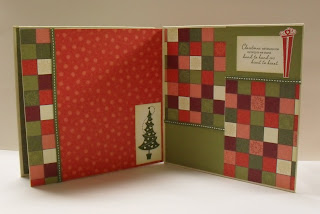

And here is the inside stretched out a bit.


Here are the two pages that are on the back


The back side stretched out shows a view of the front cover and the back cover.


All together there are 8 surfaces you can scrapbook.
Items Used
9x9 My Creations Memory Showcase (also available 6x6)
Everlasting Paper Pack (I believe this showed up on the Holiday Heyday Sale. You can always substitute another paper pack if it's sold out already. )
Heartfelt Christmas Stamp Set (more ideas for my club girls to use with their set!)
Additional Ideas
Use a more year round paper so they can display it longer.
Holiday Recipes - works great because you can stand it up on your counter while you're cooking.
Create a year of memories - Spring, Summer, Winter, Fall (2 pages each)


Tuesday, December 01, 2009

Day 3 - Christmas Blog Blitz - Got Take Out?

Here's a fun way to package up those yummy holiday goodies!


There are two sizes of containers pictured here. The decorated ones are about 5x7 and I bought them at Smart and Final. You get a package of 3 for $2.89. The package of containers has three that are approx 6x9 and I found them at the Dollar Tree!! At my dollar three they have a large section of disposable cooking trays and they are not in the same place. These were actually on another aisle...so look closely.

This is one of the large containers. I used the Heartfelt Christmas stamp set and the Twinkle paper pack.


Here's another large container and guess what Club Girls??!! You have everything you need to make these, so go pick up some containers and you're all set.
I made a different version last year and packed up my cookie exchange cookies in them. Well my good friend Candace inspired me to bring them back again this year when she baked pumpkin bread right in the container!! And now the ideas keep coming....
How about....
  • Fudge
  • Brownies
  • Cake
  • Cookies
  • Pan cookie
  • Coffee Cake
  • Pecan Tarts (my specialty)
  • Enchiladas
  • Tamales
  • Casserole
  • Your famous.........

Tomorrow I'll give you a peek at a gift I made for my inlaws. There's a reason I'm their favorite Daughter-in-law. :-)

Monday, November 30, 2009

December Blog Hop/Day 2 Christmas Blitz

Well it's Day 2 of my Christmas Blog Blitz AND it's time for the Stamp of the Month blog hop so I combined the two for todays idea....
If you arrived here from Cibelle's blog, you're on the right track. Check out what I have to share, then scroll down to the bottom to see who's next on the list. Enjoy!!
This month we are featuring December's Stamp of the Month - D1378 Notice the Details.
You can pick up an inexpensive little calendar at a variety of places this time of year. I like the ones with big calendars inside and plenty of room to write. (I'm kind of picky that way....and I write big....) I think Gail ordered this one from Current....

See...the inside has a BIG calendar... It's not all squished onto one side of the page...


Now it's time to personalize it!


Products Used:
Stamps - D1378 Notice the Details. It would be really cute to use the little arrow and the other stamps in the set to stamp on the calendar too!!
Inks - Cocoa, Sorbet and Tulip
Paper - X7100B Perfect Day

Great stocking stuffer or gift for a co-worker!


Now hop on over to Karen's blog to see what she has come up with.

And be sure to check back tomorrow for Day 3 of the Christmas Blog Blitz...you'll never look at take-out containers the same way again.

Wednesday, November 25, 2009

Day 1 - Christmas Blog Blitz


On the first day of Christmas..... Let's box things up!

Boxes, boxes and more boxes... you can find templates all over the internet. Make a few and you'll start to notice that it's not so hard to design your own.

The 2-4-6-8 box has been around forever and it's one of my favorites because I can remember how to do it without a pattern. Must be those cheerleading days coming back to me 2-4-6-8 who do we appre-ci-ate....

Start with an 8.5 x 11 piece of paper and score at 2, 4, 6 and 8 along the 8.5 inch side. Turn your paper and score at 1.5 inches. Make a few cuts and you're done. Here's a great tutorial so you can get the idea. http://prairiepaperandink.typepad.com/amyr/2006/09/2468_boxes.html
So now that you've got the basic idea.... what do I need to do if I want my box to be 2.5 inches wide?


I cut my 12 x 12 paper to 10.5 x 12 and then I scored at 2.5, 5, 7.5 and 10 (along the 10.5) inch side and then I turned the paper and scored it at 2 inches.
Edited to add: Wanna receive a fun stample in the mail from me???? Leave me a comment with a guess as to what is inside the tall box pictured above. (Candy Cane box) No fair guessing if you already know!!!!
Experiment with it. You can make your box shorter by trimming the paper. Make it skinnier by adjusting your scores.

So check out your holiday gift stash and find something to box up.

Tuesday, October 21, 2008

Invite and Card Swap

Here's my card for the November stamp of the month swap. I love snow men and I had so much fun creating this card. Of course, now that I mailed it, I wish I had added white sassy strands. I tried adding blue and didn't like it. Never even considered white until I saw Bren's card.....


And here's one of the invitations I made for the Court of Honor. The scout paper was another brand and I think it's not available anymore. I ran out and looked everywhere for it. I ended up having to use different paper on some of the invitations. Of course I kept one of my favorites for myself. The stamps are from a set called Legendary Moments. How appropriate!
Posted by Picasa

Monday, November 26, 2007

Nugget Boxes


When I first got the Bags, Tags and Boxes cartridge, I was a little disappointed because all of the boxes were so small. I played with it a little, but it just wasn't what I had in mind....until I went through my little advent calendar obsession. Now I'm just sure there are a million little projects I can do with that cartridge. It's way better than cutting paper and working with a template!

Only one little problem.... I think the cricut people made a big boo boo!! I have the baby bug so they might've fixed this with later versions, but my bug cuts in 1/2" increments. That means that when you cut a 3" matchbox and a 3" cover, then don't fit. Grrr.... Cut one of them the next size and it's too big.

Not to be outwitted by a machine, I was determined to find a way to make this work.


Matchbox Nugget Boxes

Cut 3" matchbox2 out of cardstock
Cut 3" matchbox2 with the window out of texture paper for the top.
Cut transparency 1 7/8 by 2 7/8 for window


Here's the important trick:

Score fold and glue bottom first
Then score and fold your top and place it on the bottom before you glue it.
Then glue it while it's on the bottom.
This allows you to adjust it a little bit. No one can tell by looking at the box.


Labels for nuggets are made by stamping on address labels. I used the CTMH O Christmas Tree stamp set.


Sunday, November 25, 2007

Advent Calendar

I created this one day when I was supposed to be prepping for my workshop. I have seen a bunch of cute advent calendars on several blogs and I kept thinking I'd like to make one, but I hadn't quite come up with my own unique idea yet...until I started playing with my cricut....

Paper:
Close To My Heart Everlasting
Cricut Cartridges:
George
Bags, Tags and Boxes
Christmas Cheer

The boxes are the crayon boxes on the BT&B cartridge set at 3 inches. And here is my paper saving tip. Cut your paper to 3.5 x 12. Cut two crayon boxes. The machine won't let you cut a third box. It says you don't have enough room. So flip your carrier around, feed it the other way and cut one box. Now you can get three boxes on one piece.


The cricut also cuts little "tag openings" on the side of the boxes so that's where I tied the ribbons onto the boxes.

I used the George cartridge to cut all the numbers and the letters for Countdown to.

I used the Christmas Cheer cartridge to cut Christmas.

After I was done I put Liquid Glass on all the lettering and numbers.