Monday, December 31, 2012

January 2013 SOTM Blog Hop

Welcome to the Stamp of the Month blog hop.  Each month we share ideas featuring the current stamp of the month.  Whether you are starting here, or hopped over from Traci's Blog, you're right on track.  Just keep following the links at the end of the posts to "hop" through all the blogs.

This month's set is S1301 Happy Valentines.


One of the great things about this set is that you can use the flowers for just about anything, you're not limited to Valentines!

I used our new markers to color my images. Here's a picture of the Blush and Olive marker sets


 And here are a few little projects I created....


I cut this cute little purse with the CTMH Artiste Cricut Cartridge


Supplies Used:
  • Flirty Paper Pack
  • Blush and Olive Marker Sets
  • CTMH Artiste Cricut Cartridge
  • Ribbon - unknown source

Now it's time to hop on over to Haley's Blog to see what she has created

Thursday, December 13, 2012

Wrap it Up! Christmas #3

One of the best things about being a papercrafter and owning a Cricut, is the ability to create something to go with any theme.  The theme for our holiday potluck this year is Reindeer.  I was given the task to design reindeer chinese boxes. I checked out Pinterest and Google for some inspiration and looked for images on the CTMH Art Philosophy Cricut cartridge and came up with this.....


Isn't it adorable?  But wait, they are even cuter when there is a whole herd of them hanging out together!


Art Philosophy Cartridge
Chinese Box - Pg. 24

  • Key - Shift/Drgnfly
  • Size - Fit to page 12 x 12 paper
  • Feature - Font Layer 
Art Philosophy Cartridge
Eyes/Nose - Pg 21
  • Key - Circle 1
  • Size - eyes 1/2 inch   Nose 3/4 inch
  • I added the white on the eyes with our new chalk marker which I absolutely love!!!!
Art Philosophy Cartridge
Antlers - Pg 56
  • Key - Shift/Leaf 4
  • Size - 3.5 inches (I think.  I tried several sizes between 3 inches and 4 inches)
  • Feature - Layer
Art Philosophy Cartridge
Ears - Pg 38

  • Key Shift Flower 7
  • Size - 3"
  • Feature - Layer
  • I cut the flower petals off to create 6 ears. 


Wednesday, December 12, 2012

Wrap it Up! Christmas #2

Here's another fun little gift box idea


Once again I used my Dimensional Elements In Color - Holiday to quickly decorate my  box, but you can easily adapt this to any gift giving holiday and embellish with stamps, tags, dimensional elements, ribbon and so much more.

Have you made a gable box with your Artiste Cartridge?  I'd love to see what you came up with!


Artiste Cartridge - Pg. 37

  • Key = 7
  • Feature = 3d Object
  • Size = fit to page 12 x 12 

Sizing Tip:  For some reason I've noticed that my boxes will cut bigger if I use the fit to page feature.  For instance, if the fit to page says it will cut a box 4" and I turn the feature off and then set my size to 4", the cricut will say the image won't fit.  

Monday, December 10, 2012

Wrap It Up - Christmas #1

With only two more weeks until Christmas, it's time to finish up the shopping and get those presents wrapped!  I'm going to share some fun little boxes, bags and tags that you can create to personalize and decorate gifts for co-workers, friends and all those people that provide you with great service throughout the year (hair dressers, dog groomers, water delivery, trash pick-up, apartment managers etc.....)

To make embellishing quick and easy, I used the Dimensional Elements In Color - Holiday.  

I used the Artiste Cartridge

  • Key = 1
  • Feature = 3d Object 
  • Size = fit to page on 12x12


To decorate the flap with a coordinating paper or color, attach a rectangle of the paper to the flap, flip over and trim along the edge with scissors.

Friday, November 30, 2012

Dec 2012 CTMH Stamp of the Month Blog Hop

 Welcome to the Stamp of the Month blog hop.  This month we are featuring S1212 Year Round Cheer (set of 12).  Whether you're starting here, or you hopped over from Tamra's Blog, you're right on track.  Just follow the links at the end of the posts and you'll be able to see all the fun creations.


First let me say that... I love, love, love this set!  While it says it is a "set of 12", it can really be a set of 24 or more.  One of the fabulous things about clear stamps and clear blocks is that you can easily "pick and omit." That means you can ink up a portion of the stamp and just stamp that....or... I know this might give some of you a heart attack but you can.... cut your stamps!!!  Carefully cut the sayings off and you now have two separate stamps.  Tip: If it's hard to get your scissors between the two elements GENTLY stretch the stamp and spread the area out and then cut with the very tip of your scissors.

Please note - no stamps were harmed in my samples.  So far I have not cut mine apart but it's just a matter of time.  I'm pretty sure the bbq, sing in the rain and stay lucky might not be so lucky. LOL

I featured the card and envelope featured on the "2" key on the Artiste Cartridge


Inspired by my buddy Sandra, I turned the envelope into a little treat pocket.


I inked only the little heart to create my random stamped background on the card.

Supplies Used:

  • Cardstock - Blush, Black and Ruby
  • Ink - Ruby
  • Marker - Blush
  • Black sharpie marker for the doodling


I hope you enjoyed the first little peek at this set.  I have several more projects in the pipeline so check back throughout the month!!  This is just the beginning.


Now it's time to hop on over to Jill's Blog to see what she came up with.

Four Ideas for Your Advent Calendar

I hope you have all finished up your advent calendars!  I am so glad that I got mine done ahead of time, but of course I'm still filling it up at the last minute. :-)  That's how I roll....


Before I start to share these incredible ideas let me say.... It's ok if you don't have the time, energy or the means to pull any of these off!  Sometimes we put too much pressure on ourselves during the holidays.  As I read these ideas I thought "I want to do them all!!!" Since I can't clone myself and I do have a job and a family, I'm going to school and I'm a Close To My Heart consultant, I think I'll myself a break.  I'll enjoy what I have already decided to put in my calendar and keep my eyes and my heart open for opportunities to serve.

One of my favorite memories of last holiday season was the sincere gratitude I received when I helped an elderly woman load her groceries into her car.  I may have been serving her, but the memory of the encounter has warmed my heart and blessed me all year long.

And with that....here are some ideas that I might do next year, or the year after, or.....

1. Add a little humor to the stressful days-
Over at Over the Big Moon they created printable jokes for their Elf on the Shelf.  There are 20...Make up four of your own to fill every drawer.

We need a little humor at work too, so I printed an extra set to display on my counter.  We're not here tomorrow so we got to enjoy our first joke today.

2. Random Acts of Kindness
Katherine shared a great idea she did with her family and since good ideas inspire others and friendships, check out how this blogger implemented the idea with her family.

3. An Activity a day 
You're probably doing many of these things with your family anyway so this might be easier than you think!
Check out All Things Simple's post to see their list


Help keep your heart centered on what the season is about
A few years ago I came across a scripture a day advent that really helped me to pause during this crazy season.  Since then I've varied it many different ways.  Last year I tried to memorize The Living Christ.  I didn't finish the whole thing, but that just gives me something to work towards, right?

I don't mention my faith on my blog much, but I am a member of the Church of Jesus Christ of Latter-Day Saints (Mormon) so I chose a scripture advent that reflects my beliefs.  There are many scripture references from the King James version of the Bible.  Feel free to adapt these ideas for yourself and/or search the internet for additional spiritual advent ideas.

4. Scripture a Day
Come Let Us Adore Him - Daily Devotional about Christ
This is the one I'm going to read this year.  

Miss the boat and wish you had started this earlier?  Well, here's a little mini spiritual version that goes from December 13th - December 25th. Prophecies of Christ's Coming

Do you have additional ideas to share?  
I would love to hear if you're using an advent calendar and what you are doing.


Wednesday, November 07, 2012

CTMH Workshop on the Go Advent Calendar Kit

I took my Workshops on the Go Advent Calendar Kit to the Scrappin Escapes retreat last weekend and put it all together.  My picture and the picture in the catalog just don't do it justice.  It is so cute in person!  I love it. The drawers are nice and big so you can put a variety of items inside. 


Here are a few tips and suggestions to help you assemble your kit:
  • If you don't have a lot of time to sit and do it all at once, try breaking down the steps.  Cut your drawers one day.  Score/fold them all another day (if you score and pre-fold, but don't glue your drawers, it will help you identify where to stamp your images.) and then stamp and decorate at a third crafty session.
  • Stamp all of your images and then set aside to dry so you don't smudge them.
  • Assemble the boxes after you decorate them.  It's easier to work with them when they are flat.
  • Don't worry if you stamp a little crooked.  (I did!) I think it adds to the charm!
Here are some suggestions for filling up your drawers:
  • Candy (of course!)
  • A scripture a day
  • An act of service suggestion
  • A Christmas task (hang the stockings, decorate the tree etc.)
  • Or why not make each day an event, put a scripture, an act of service suggestion and a piece of candy for the blessing in each drawer so you can help your children think beyond gifts and toys!
Do you have more ideas?  Share them in the comments!

You can purchase the Workshop on the Go Kit which includes the cubby, paper, stamp pad and dimensional element decorations (I added the bitty sparkles) or you can purchase the cubby separate if you'd like to create a fun home decor item with different papers that can be used all year long.

Shopping List
G1052 Workshops on the Go Advent Calendar Kit - $44.95
Z1804 My Creations Cubby - $16.95
z1263 Bitty Sparkles - $2.95

Head on over to my website to buy your supplies!


Wednesday, October 31, 2012

Nov 2012 CTMH - Stamp of the Month Blog Hop

Welcome to our Stamp of the Month blog hop!  Whether you're starting your journey here, or you hopped over from Mary's Blog, you're right on track.  Just look for the links at the bottom of each post to hop your way through all the fabulous creations.

This month we are featuring S1211 Capture the Date.  This set is perfect if you are part of my calendar group.  It has three different sizes of numbers.  You can use the same numbers for the entire month or highlight a day by using the larger numbers.


On the December calendar page below I used the medium sized numbers.  


Here is the top part of the calendar featuring the Pear and Partridge Paper Pack.   We have had so much fun working on the calendar pages this year that we are going to do them again next year!  Please let me know if you'd like to order kits for next year.


Now it's time to head on over to Traci's Blog to see what she has created.

Tuesday, October 16, 2012

Owl Card - CTMH Cricut Artiste Cartridge Project

Here's a fun little project from one of the Halloween pages on the Close To My Heart Artiste Cricut Cartridge.

It doesn't look to spooky to me. :-)


Supplies Featured:
  • Clementine Paper pack
  • Ribbon - unknown source
  • Artiste Cricut Collection


Are you ready to buy your own Artiste Cartridge.  You can head over to my website and shop for that and all the other gorgeous Close To My Heart products or click the Buy Now button below.


Monday, October 15, 2012

Paper Cupcakes Artiste Blog Hop

Welcome to the Paper Cupcakes Artiste Blog Hop.  Today we are featuring the Thanksgiving key on the Close To My Heart Cricut Artiste Cartridge.

Whether you're starting your journey here, or you hopped over from Linda Taylor's blog, you're right on track.

I had so much fun playing with the items on this key.  Instead of going with the traditional shades of Thanksgiving, I used the Clementine paper pack and went with some lighter shades.  (Does anyone else think of Holly Hobby when they see this paper? - I know, I'm dating myself. LOL)

Here's a little collection of items I created that could dress up your holiday table.


I also created a video to show you how easy it is to create the 3-d box.  Please let me know what you think!


Now it's time to hop on over to Karen Cullen's blog to see what she has created.

Sunday, September 30, 2012

CTMH - October SOTM Blog Hop

Welcome to the October Stamp of the Month blog hop.  Whether you're starting here or you hopped over from Kami's blog, you're right on track to see a ton of fun ideas featuring S1210 Very Merry Christmas.

Christmas is such a busy time so I love to create quick and easy projects and this set really helps you make something gorgeous in just minutes.


Supplies Used:

  • Z1738 Colonial White Die-Cut Cards and Envelopes
  • X7162B Pear & Partridge Paper Packet
  • Z1752 Clear Assortment 
Now it's time to hop on over to Adeline's blog to see what she has created.


Thursday, September 06, 2012

CTMH Cricut Artiste Swing Cards and Video featuring Moonlight Paper Pack

More Halloween fun!  I love making cards for holidays when cards aren't expected!  It's a fun surprise for your friends, family and co-workers and these cards are so quick and easy, you'll want to make them for all the ghouls and vampires in your life.


Check out my video to see how these cards "swing" open!  


Products Used:

  • Close To My Heart Cricut Artiste Cartridge
  • C1522 Creepy Creatures stamp set
  • X7161B Moonlight Paper Pack
  • Black Stamp Pad
  • Markers: Smokey Plum and Olive
Need any of the products featured?  I'd love it if you'd purchase them from me!  Visit my website for quick and easy online shopping!

Wednesday, September 05, 2012

CTMH Halloween Display Tray featuring Moonlight Complements

I was so excited when I saw all the fun Halloween supplies in our Idea Book/Catalog. It was really hard not to immediately begin creating!  I know it's still a little early, but October will be here before you know it and October 1st is the day I start decorating my office!

This project was so quick, easy and fun and I am making it EVEN easier for all my customers.

All you have to do is buy the display tray ($19.95) and the Moonlight Complements Dimensional Elements ($4.95) and I will provide the paper, cricut cuts, and close-up photo needed to complete the project.

You can easily personalize the project by putting photos in a couple of the sections instead of the decorations.

When you are done you will have a few elements left over that you can use on your other spooky projects.


Friday, August 31, 2012

CTMH Sept Stamp of the Month Blog Hop

Welcome to the Stamp of the Month blog hop.  Whether you're starting here, or hopped over from Angela's Blog, you're right on track.  Just keep following the links and you'll see all the fun samples we have to share.

I think my favorite thing about this adorable set is....I got to use my new markers to color the images.  I am loving our new markers!!  They are so easy to use.

Instead of going with the traditional fall colors, I switched things up a bit and went with some lighter shades.  I used the colors in the Clementine Paper pack.

This month I also featured a fun product that we often forget about...photo storage pages.  The storage pages are perfect for quick and easy scrapbooking.  You can simply slide your photos in and be done, or you can add some patterned paper and dress it up.


 Now it's time to hop on over to Susan's blog to see what she created.

Wednesday, August 29, 2012

Workshop Cards featuring CTMH Dakota Paper Pack

At my August workshop I featured cards using the Dakota paper.  I loved using this paper so much.  I wish the colors in my photos had turned out better because they are so rich and gorgeous in person!  I've also become a bit obsessed with the Durables Studs.  They look so good.  I want to add them to all of my projects now.

The first card was inspired by Alissa Chilton.  I had to switch it up to accommodate the size of card I was using and the papers I already used in the other projects.


Next up is a quick and easy card that is very striking in person.  Using the durables studs help carry that masculine feel.


And last, but definitely not least... is my favorite of the bunch!!  It can be a card or a gift card holder.  Check out my video below for more details.  I love this style of card and plan to make more!


Products Used:

  • X7157B Dakota Paper Pack
  • X1701 Baker's Twine Neutral Assortment
  • Z1706 Round Durables
  • Z1705 Square Durables
  • Z282 Black Hemp


Friday, August 24, 2012

Loving our New CTMH Markers!!

I was so excited when they announced that we are now carrying alcohol markers!!  I love to color.  I get excited whenever kids pull out coloring books.  I will gladly sit down and color with them.  I just get frustrated when they keep wanting to turn the page before I am finished with my masterpiece. LOL

I got my shipment of markers last week and I am working on some fun samples, but here's a great video from Close To My Heart to get you started.


Wednesday, August 15, 2012

Paper Cupcakes Blog Hop featuring It's Your Day

Welcome to the Paper Cupcake's Blog Hop! (Paper Cupcakes is the team name of my great upline Bren Yule!)

Whether you are starting here, or hopped over from Bren's blog, you're right on track!

Today we are featuring the National Stamping Month double stamp set "It's Your Day."


You can purchase this fun set for $5 when you place an order of $35 or more between August 15 and September 30, 2012.


I love how  many fun background stamps come in the set. You can make patterned paper to match any color combination.


Combine Specials and Get More Bang for your Buck!!!!

Not only is this a fabulous deal all by itself, but just look what you can do when you combine specials and the purchase of our new Artiste Cricut Cartridge

Purchase the Artiste Cartridge - $99 (includes 3 stamp sets and 3 pkgs of dimensional elements)


That purchase qualifies you to purchase the Stamp of the Month for $5


and the It's Your Day double stamp set for $5.


For $109 plus tax and shipping you end up with
  • Artiste Cartridge
  • 6 Stamp Sets!
  • 3 Pkgs of Dimensional Elements
  • And a fun little organizer bag from me to you to keep it all organized together


Now hop on over to Heather's Blog to see what she has created!


Monday, August 13, 2012

Love Decor featuring CTMH La Belle Vie Paper Pack

Here's another fun sample from my Extravaganza booth at the Close To My Heart convention.  I created my own chipboard pieces and covered with paper from the La Belle Vie paper pack.  I used my cropodile to punch holes and hooked together with extra rings I had from the banners we sell in the catalog and I added some of our fun new Tulle!!! Love that stuff.  You can add it to anything to give it a little "ohh la la."

This is a really quick and easy project that you can adapt to any home by switching the paper pack to one that matches your decor.


I included pictures of a few of the things I love...

My crazy Merrill family!
My boy and his girl walking with my little pup.
My hubby and I
and of course...who could resist that little Maisy face!

Supplies Used:

  • X7158B La Belle Vie Paper Pack
  • X7158C La Belle Vie My Stickease
  • Z1798 Black Tulle Ribbon
  • Z1393 Black Mini-Medley Accents (ribbon)


You can order any of the supplies I featured on my website or contact me to get details about how to host your own gathering online or in person!

Thursday, August 02, 2012

Card featuring CTMH Flirty Paper pack

Heading off to girls camp and I didn't quite get all my posts scheduled before hand so I thought I would test out my blogger iPhone ap. So far it's looking good. I might just be able to send off some updates from camp if I have a good enough signal.

Here's a quick and easy card I made featuring the Close To My Heart Flirty paper pack.


fun technique - color sparkles with our new markers to match your project.

CTMH Cricut Artiste - Pop-Up Cards

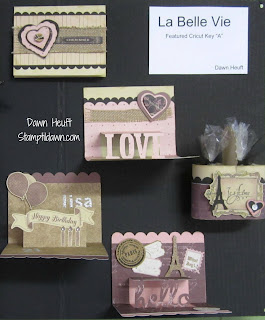
One of the keys I was assigned to use for my Extravaganza Presentation at the Close To My Heart 2012 Convention was the "A" key and it contains fun pop-up cards.


You can create a card that says "Hello" or one that says "love," but as you can see on my board below... I came up with a third option.  Simply flip the card insert over, or cover it with paper and you can have a blank canvas to create whatever kind of pop-up card you'd like!


I'll post a better picture later...but can you tell what part of the key I used to create the little gift with the eiffel tower on the tag?  It's the adorable mailbox!  I put two mailboxes together to create something new.  Stay tuned and I'll post a better picture and more details.

Supplies Used:
  • La Belle Vie Paper Pack
  • CTMH Cricut Artiste Cartridge - A Key as well as a few cuts from other keys.
  • Glamour Glitter Alphabet
  • Birthday Stamps/Balloons are from set included in Artiste Bundle
  • D1528 Jardin Stamp Set
  • La Belle Vie My Stickease Assortment
  • Black, Smokey Plum, Desert Sand and Blush inks
Are you ready to add the Artiste Cartridge to your collection?  You can purchase it, or any of the other Close To My Heart products I've featured, on my website, or contact me to book your own online gathering and earn FREE product too!


Wednesday, August 01, 2012

Have you ever thought about it?

Have you ever thought..."Dawn sure has a lot of fun with Close to My Heart, I'd love to do that?"

Well maybe now is the time!  Close To My Heart updated their kit prices and made it even easier to start your own business.  If you've been scrapbooking and stamping for a while and have collected your own stash of supplies then the new Essentials $49 kit (approximately $130 retail value) is just for you.  You can plan your first workshop or gathering by making adorable samples with the Avonlea products included in the kit and then order what you need for your next event and customize it to your needs and likes.


If you're brand new to Close To My Heart and don't have as many tools in your stash, you can take a look at the $99 kit (approximately $280 retail value) to see if that meets your needs better.


And to make the deal even sweeter...the August special means you will also receive the amazing bag we received at convention.  These bags are so highly coveted that my fellow consultants that did not attend convention have been BEGGING to buy one!!!  While CTMH says they have many of these bags in stock, they also said "while supplies last!"  And I have already seen a ton of people signing up today so if this is something you want to do.... do it RIGHT AWAY!


Here's a little about how I run my team and what you can expect from me.


  • I have been with Close To My Heart/D.O.T.S. for 17 years so I have a wealth of experience running and adapting my business to the needs of my family.  I have also been honored to be selected to teach at many of the CTMH corporate events and conventions.
  • I have a team facebook group set-up where you can get to know fellow team members and learn from each other.
  • I post little challenges and inspiration 1-2 times per week.
  • I am a "no pressure" girl, so that means I am here to lead and support you, but I will not hound you!  You tell me what your goals and needs are and I will try to help you along.
  • Team meetings in San Diego and I am available to skype and email my long distance team members.
  • I also allow my team members to attend my workshops/crops (as long as there is space) so that you can create fun projects and see how I run my business.  You can adapt and improve upon my ideas to build your own business.

Please feel free to contact me if you have any additional questions or pop on over to my website and start your career today!  We can't wait to welcome you to the Paper Hearts team!

Tuesday, July 31, 2012

CTMH August SOTM Blog Hop

Welcome to the August Stamp of the Month blog hop. You may be starting here, or you may have hopped over from Teresa's blog, either way you are in for a treat.  Once you're done checking out my creations, simply follow the link at the end of my blog post and continue along on your journey.  Eventually you will finish the loop and see all the fun projects.

This month we are featuring S1208 Baroque Borders.


Baroque Borders is one of those stamp sets that is great to add to your collection.  You can use it to create quick and easy backgrounds that will add richness to any project.  I've taken one of the stamps in the set and stamped champagne ink on champagne cardstock to create the background below.  You could use this same technique on a scrapbook page or a 3-d item.

I also used our new Close To My Heart Cricut Artiste Cartridge to cut the paper the saying is stamped on.  Not only do the stamp sets tell you which cartridge to use and what size to cut the image, but now they also tell you what page the image is on in the book. I simply chose my stamp, next to it it said "1 1/2" pg. 65," so I flipped to that page, found my image and cut it.  Definitely Faster, Simpler and Easier!!!


You can also use the images as a focal point on any project.  On the card below I decided to use one of the beautiful corners as my main image.

I stamped it in outdoor denim on the blue grid pattern in the new Scholastic paper pack.


And just for fun, I flipped the same paper over and added some of our new burlap ribbon to create the card below.  You would never know I created both of these cards with the same paper pack!  They look completely different!


Supplies Used

  • Champagne  and Outdoor Denim Inks
  • Scholastic Level 2 Paper Pack
  • Z1701 Bakers Twine - Neutral Assortment
  • Z1760 Burlap Ribbon
  • D1525 Casual Expressions (set of 12)
Please contact me or shop on my website if you would like to purchase any of the items featured.  I conduct workshops in Lakeside, CA and am available for retreats, parties and private workshops in the San Diego area.

Now it's time to hop on over to Judy's blog to see what she created


Wednesday, July 25, 2012

Sight Seeing during the CTMH Convention in Dallas

One of my favorite things about attending Convention (besides getting to see all the amazing new products live and in person!!!) is the opportunity to hang out with fellow consultants and team members.  It is always a crazy fun time.  Some of them might say I bring along the crazy, but I think my buddy Heather might have to take on some of that responsibility too.

First we hopped on a bus to take us to downtown Dallas...


Heather wore her new boots!  Apparently they serve drinks and very hot cowboys help you try boots on.  Her story about her shopping experience definitely made me consider buying some boots!


But we went to dinner next door instead.  We enjoyed some fabulous steak!  Yummm... Texas serves my kind of food!  Sorry, but there is not a vegetarian bone in my body. 


Sure wish I had my bike so I could join the group ride that was going by!


Thankfully Heather had taken a tour of Dallas before we arrived and she has an AMAZING memory!!  She shared all sorts of cool stories, facts and trivia about the area.  I think she could seriously get a job as a tour guide!!


I love taking pictures of beautiful buildings with interesting architecture!


This JFK monument was purposely built to look unfinished to represent the unfinished life of JFK.


I have grown up hearing all the speculation and conspiracy theories about the assassination of JFK, but it was a little before my time so I never really had a personal connection to it.  Visiting the area and the site gave me a very different perspective.  I was amazed at what a small area it was. It was fascinating to see where the route was originally planned and where it was changed to.  

I am so glad that we took the time to visit this area during our trip!


The Grassy knoll.....Even this picture makes the area look bigger than it is.  It is not a large sprawling area of grass.  It's very small and the street is only two lanes.


I had such high hopes for this picture!  You would not believe how long it took us to pose and get the camera set up...but then it was getting too dark.  I had to lighten the photo up so you could even see us!