Wednesday, April 24, 2013

Sneak Peek at the May National Scrapbooking Month Special - Dream Pop

I took a little time out from making our Harlem Shake - Scrapbook Style video, to actually create some samples, at our team retreat last weekend.  I brought the Dream Pop paper and some coordinating accessories and inks and set out to see how many different things I could make.

I figured that since I'm going to tempt you with a sneak peek at this special, I might as well go all out and share my little bakery treats!


I used the Artiste Cricut Cartridge and my Cricut Expression to create these adorable treats.  The pie box is cut at 6" and the cupcake is cut at 5 1/2". I love how perfectly the Colonial White Rosette Ribbon goes with them!  The little bow on top of the pie box is cut on the cricut too.  I kept the design sweet and simple so that you could easily make a bunch of them for your next party!

This is just the beginning!!!  I made a ton of samples and will be featuring them over the next couple of weeks so make sure to check back often or subscribe to my blog.

How can you get the Dream Pop Paper Pack?
In honor of National Scrapbooking Month, you can get the yummy Dream Pop paper packet for only $10 when you spend $35 in May (valued at $19.95 retail)! This exclusive paper packet includes 12 cardstock sheets as well as 12 B&T Duos® papers that were specifically designed for this promotion only—you can’t get these sweet colors and patterns anywhere else! Start National Scrapbooking Month off right with a unique paper packet at a bargain price and get your creative juices flowing! Also, consider hosting this month: Hostesses receive one paper packet free with qualifying May Gathering sales totals of $400 or more.

So "POP" on over to my website starting May 1st to get your own "Dream Pop" paper pack!!

Sunday, April 21, 2013

Harlem Shake at the Scrapbook Retreat....

So what did YOU do this weekend?

Me?

My weekend was filled with hilarious laughter, some scrapbooking, some stamping, some card making and some Harlem Shaking!!

I tend to come up with some interesting ideas and I wasn't sure this was a good one.  In fact I almost chickened out and didn't share this brainstorm.

It all started with a phone call to Bren...

"Hey Bren... I have a really funny idea.  Have you ever heard of the Harlem Shake?"...

Then I had to explain what it was and encourage her to watch some videos.  Some of those videos can be a little...well... ours is probably one of the cleaner versions.

Less than 48 hours later this was born


I think the best part was that my AMAZING team mates totally jumped on board.  Many of them had no idea what we were talking about, but they brought costumes and totally went for it.  I have watched this video about 20 times and I laugh every single time.  As you look around at each person and see the crazy things they did.  It just cracks me up.

Now do you see why I love these women so much!!!!!

I can't promise that every team meeting or retreat will look like this one, but I can truthfully say that I have created some amazing memories and I have the most fabulous friends because of the connections I have made with Close To My Heart.

I would love to have YOU join my team!!  The recruiting special is still going strong.  You get 4 FREE stamp of the month sets when you join by April 30th and our kit price is only $49!!

Hop on over to my website and start your memories today!


Monday, April 15, 2013

Chantilly Chalkboard Technique Card

I found a bunch of photos I haven't blogged.  I guess I better get busy and get some posts written!!

Last month I was going through a bit of a chalkboard obsession!!!  It started out because I fell in love with our chalkboard marker!  I used the marker to create the little polka dot border on the card below.  It shows up beautifully on dark paper and makes it fun to add little white accents.


The stamp I used is from the For Always Card Workshop on the Go Kit (G1060).  I love that stamp set so much!  I just keep using it and using it.  I used our white daisy ink pad to stamp the image.  Just give it a few minutes to dry and it comes out perfect.  No need to emboss!

Supplies Used:
  • White Daisy Stamp Pad
  • Chantilly Paper Packet
  • Chantilly Textiles
  • Chalk Marker
  • Black Cardstock


Tuesday, April 02, 2013

Sunday's with Daddy

I think I've mentioned it a few times here, but my Dad is pretty sick.  We've had many close calls over the years, but like a cat with nine lives, he keeps cheating death.  At some point you begin to wonder how many lives he has used up.  A couple of months ago, we thought he was at the end of his ninth life....

I love my Dad and we have always gotten along well, but he's not what you would call communicative.  If you call him on the phone, you better have a list of topics to discuss or he'll be hanging up the phone or passing it to someone else pretty quick.  Of course you can get him pretty worked up if you bring up a topic that he is passionate about, and 20 years in the Navy means there's a sailor's mouth to go with it!  So conversations with Dad are kind of a balancing act.  I'll admit that I have brought up a contentious topic a time or two, just to get him to talk to me. 

I didn't worry about Dad much before.  He keeps himself busy. I know he loves me.  He knows I love him.  He doesn't expect me to call or visit all the time. After all, the phone works both ways.  It's not like he's calling me!

Well he has been so sick, that he has been pretty much bed ridden.  My step-mom handles so much and calls and visits ARE important to her, so I decided I need to make an effort to try and visit every Sunday.  At first there were a lot of things to discuss.  Fun topics like what kind of funeral he wants to have and the importance of following the "rules!"  He's now being fed via IV and you can tell his brain is getting food.  He is more coherent and he will actually carry on a conversation if you can come up with a topic.  I noticed that he started to get the little sparkle in his eye when I would show up to visit and he would ask about my trips and my son.  Could it be that my dad was talking to me?

One day I had a brainstorm.  I had been seeing many blog posts and pinterest posts about people participating in "list a day" challenges.  What if I give my Dad homework each week?  I could assign him a list or two to work on and then we could talk about them on Sundays.

Little did I know how amazing that brainstorm was! A couple of days after I emailed the first lists my step-mom wrote back to say how much fun he was having.  

I think we are all having fun!  And because he has shared so many interesting stories, I thought it would be fun to start a new series called Sunday's with Daddy.  Each week I'll share part of what he has shared with me or one of the pages in the scrapbook I've created about our visits.

So be sure to come back on Sunday for the first installment of  "Sunday's with Daddy"

I haven't taken any photos lately - but here's one from December so you can see how tiny and frail he was.  My step-sister (Catherine) and I brought a little Christmas cheer...


Sunday, March 31, 2013

April CTMH SOTM Blog Hop - My Sunshine

Welcome to the April Stamp of the Month (SOTM) blog hop!  Whether you arrived from Adeline's blog or you are starting here, you're right on track.  Just follow the links at the end of the posts to "hop" through all the participating blogs.

This month we are featuring S1304 My Sunshine (set of 8).


My customers often ask "how do you come up with ideas?"  Well, sometimes I wonder the same thing. haha!  But seriously, I wasn't sure what to do with this set and as soon as I started playing with it, I fell in love!!  So here are a few things that I did to get me started.

  • Pick a paper pack or color scheme to work with.
  • Pull out the inks and embellishments that will match.
  • Stamp each image on a piece of scratch paper just to see how it stamps and what it looks like.
  • Cut corresponding cricut shapes, if available and stamp a couple.
  • Flip through the Idea book and look for card styles or scrapbook pages that might work.
  • And don't be afraid....to copy someone else!  Yep, I said it!!  Give credit of course, but sometimes you just need to sit down and copy something in order to get your creative juices flowing.
After I stamped a couple of images and tried to figure out how to use the balloon stamp, I discovered that it kind of looked like a flower petal so I stamped and cut out a bunch and created a flower.


One of the things I love about this set is the separate stamp for the bird wings. It makes it so easy to add a second color to the bird.


Here's a little video with more info, tips and ideas


Now that you have seen what I dreamed up, it's time to hop on over to Pam's blog to see what she has come up with. 

Thursday, March 21, 2013

CTMH Love Your Layout - March Studio J Tutorial

Have you been following the Love Your Layout videos?  I love these.  They highlight different techniques in Studio J and they are quick and easy to follow.  You could even watch the video on your ipad and play along on your computer at the same time!

Step 1 - Login or create your Studio J account on my website

Step 2 - Watch this video. :-)


Tuesday, March 19, 2013

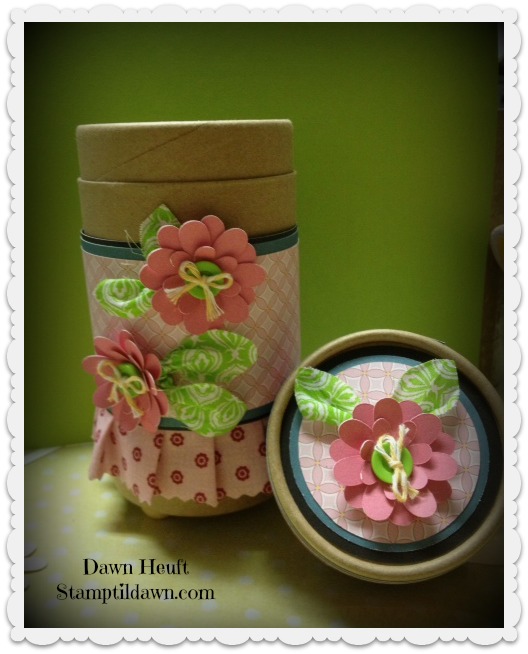
I'm in Love... with TUBES...again....

I am loving the new My Creations Kraft Container (Z1833 $3.95) in our current idea book because it is like a blast from the past for me.  Many years ago (geez, I don't even remember how long ago it was....), my buddy Candace got a ton of mailing tubes for an incredible deal.  So we went a little tube crazy... and then we sent a bunch of samples to CTMH and not only did they publish our artwork... they published the "article" I sent to them too!!

I still have a copy somewhere and I believe I still have a couple of decorated tubes too... I'll try to post them tomorrow.  That will be fun!!

Ok, back to business... We are calling these "tubes", Kraft Containers (but really...it's a tube, you know!)


You can decorate these to go with any theme or occasion.  Use them to store little odds and ends on your desk or dresser or....create a fun gift!

Birthday - put a balloon, candle, some goodies, etc and give it as a birthday gift
Easter - I'm sure this thing will hold lots of yummy Easter goodies!!!
Mother's Day - pamper your Mama and put some lotion, bath salts and a gift card inside
Father's Day - Yep, a tie will fit in there.  But I'm sure you could be a little more imaginative than that.

The ideas are ENDLESS!!!

Let's build a list.  Leave a comment with an idea of what you would stuff inside.  They are about 3 inches wide and 6 inches tall....